Root: Difference between revisions
From Retroid Handhelds
Jump to navigationJump to search
LiquidDivide (talk | contribs) |
|||
| (One intermediate revision by one other user not shown) | |||
| Line 17: | Line 17: | ||
<li>Click the `Select and patch a file` option. This will open your file manager. Find your `boot.img` file and select it.</li> | <li>Click the `Select and patch a file` option. This will open your file manager. Find your `boot.img` file and select it.</li> | ||
<li>Click the `let's go →` text. This will create a new patched boot.img file in your downloads directory.</li> | <li>Click the `let's go →` text. This will create a new patched boot.img file in your downloads directory.</li> | ||
<li>Use mixplorer to move the patched boot.img file your external card.</li> | <li>Use mixplorer to move the patched boot.img file back to your external card.</li> | ||
<li>Copy the patched file from your external storage to your pc.</li> | <li>Copy the patched file from your external storage to your pc.</li> | ||
</ol> | </ol> | ||
| Line 56: | Line 56: | ||
|- | |- | ||
! scope="row" style="text-align:left;"| ExSDCard Access Enable | ! scope="row" style="text-align:left;"| ExSDCard Access Enable | ||
| | | An extension that allows apps to write to the external storage directly via a new path available on the root. The new path is `/mnt/media_rw`. | ||
|- | |- | ||
! scope="row" style="text-align:left;"| MixPlorer | ! scope="row" style="text-align:left;"| MixPlorer | ||
Latest revision as of 21:27, 26 July 2021
Root
[edit]Rooting the RP2 will give you root access to the device. This means you can modify system files and do pretty much anything with it.
Prerequisites
[edit]- Install the SPFlash tool. You can find instructions for this in the Firmware section of the site.
- Download the firmware files for the OS that you have installed on your device. Be sure to install the OS that you would like to use before performing this root.
- Install the Magisk app from playstore or wherever else you'd like to get it from.
Create a patched boot image with magisk.
[edit]- find the `boot.img` file in the downloaded OS files. Copy this over to your device on your external storage card.
- Launch the Magisk application.
- Click the instal button near the top of the screen.
- Under the options box you see now, click the blue `next` link. This will expand the Method box.
- Click the `Select and patch a file` option. This will open your file manager. Find your `boot.img` file and select it.
- Click the `let's go →` text. This will create a new patched boot.img file in your downloads directory.
- Use mixplorer to move the patched boot.img file back to your external card.
- Copy the patched file from your external storage to your pc.
Flash the patched image
[edit]- Launch the SPFlash tool.
- Click the download tab at the top.
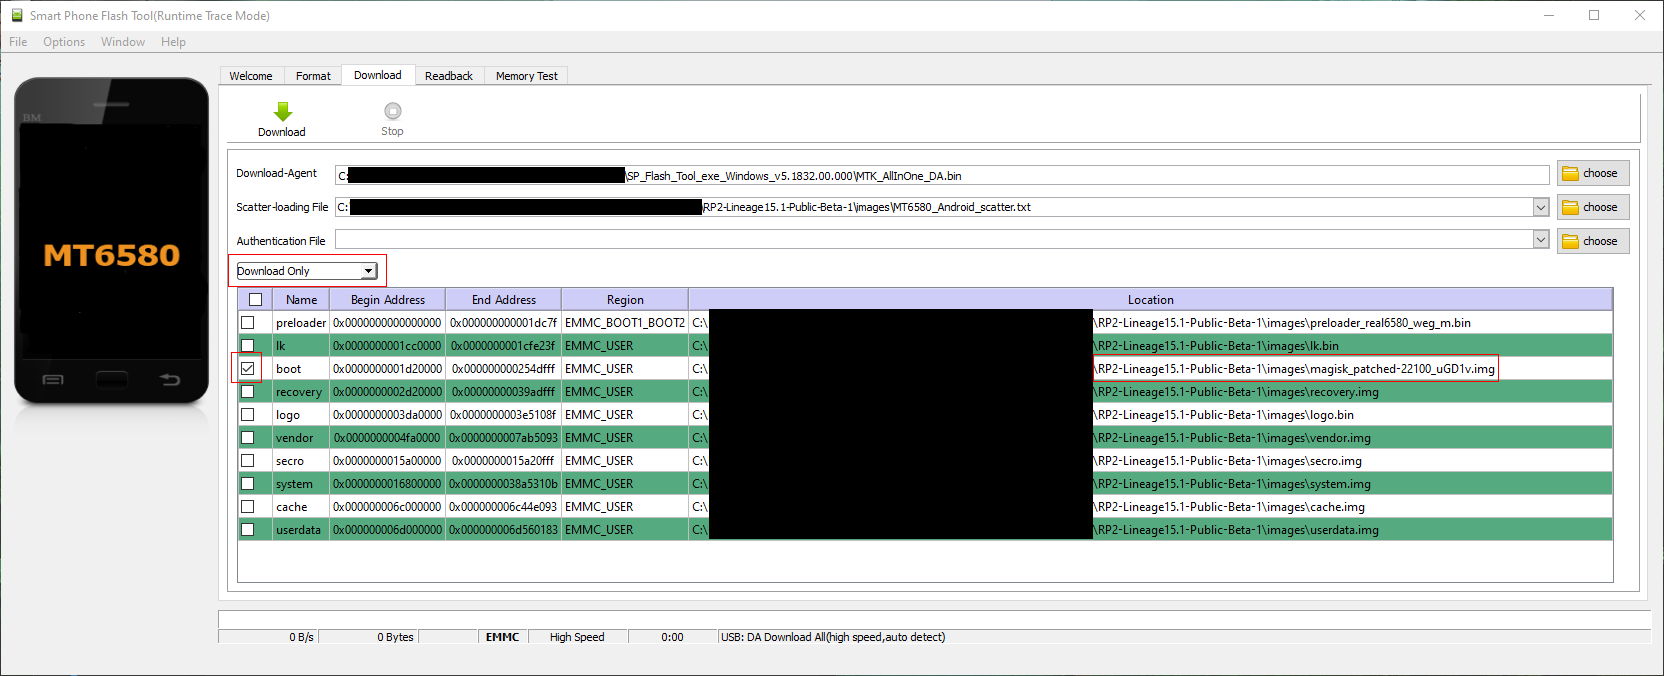
- Make sure the drop down above the list has `Download` selected.
- Make sure the download agent is properly filled out. It should be included in the SPFlash tool folder and is named `MTK_AllInOne_DA.bin`
- Make sure the scatter file is filled out properly. It is included in the OS files you downloaded from the Firmware instructions.
- After loading the scatter file, all the boxes in the list at the bottom will be checked. At the top of the list is a toggle to check/uncheck all the boxes. Click it to make sure all the boxes are unchecked.
- Click the checkbox to the left of the row with `boot` for the name.
- Click the location column of the `boot` row and find your patched image file.
- Double check to make sure everything is right. Use the image below to verify you have the correct settings.
- Once you are sure everything is right, click the download button at the top of the screen.
- Connect your RP2 to the PC using the USB-C cable (be sure to use a USB 2.0 port).
- You should see a progress bar at the bottom and eventually a popup with a big green checkbox on it once the process is complete
Verify
[edit]- Unplug the RP2 from the PC and boot it up.
- Once it is booted, open the magisk app. You should now have a button bar at the bottom.
- Clicking the far right one (the puzzle piece icon) will allow you to install various plugins that utilize your new rooted device.
Useful Plugins and Tips.
[edit]| Plugin or App | Description / Instructions |
|---|---|
| ExSDCard Access Enable | An extension that allows apps to write to the external storage directly via a new path available on the root. The new path is `/mnt/media_rw`. |
| MixPlorer | Settings → More Settings. Click `Allow Root` option for access to all files on the RP2 in Mixplorer. |
| Termius | Enter the command `su` to get root access for termius. |
