Root
From Retroid Handhelds
Root
Rooting the RP2 will give you root access to the device. This means you can modify system files and do pretty much anything with it.
Prerequisites
- Install the SPFlash tool. You can find instructions for this in the Firmware section of the site.
- Download the firmware files for the OS that you have installed on your device. Be sure to install the OS that you would like to use before performing this root.
- Install the Magisk app from playstore or wherever else you'd like to get it from.
Create a patched boot image with magisk.
- find the `boot.img` file in the downloaded OS files. Copy this over to your device on your external storage card.
- Launch the Magisk application.
- Click the instal button near the top of the screen.
- Under the options box you see now, click the blue `next` link. This will expand the Method box.
- Click the `Select and patch a file` option. This will open your file manager. Find your `boot.img` file and select it.
- Click the `let's go →` text. This will create a new patched boot.img file in your downloads directory.
- Use mixplorer to move the patched boot.img file back to your external card.
- Copy the patched file from your external storage to your pc.
Flash the patched image
- Launch the SPFlash tool.
- Click the download tab at the top.
- Make sure the drop down above the list has `Download` selected.
- Make sure the download agent is properly filled out. It should be included in the SPFlash tool folder and is named `MTK_AllInOne_DA.bin`
- Make sure the scatter file is filled out properly. It is included in the OS files you downloaded from the Firmware instructions.
- After loading the scatter file, all the boxes in the list at the bottom will be checked. At the top of the list is a toggle to check/uncheck all the boxes. Click it to make sure all the boxes are unchecked.
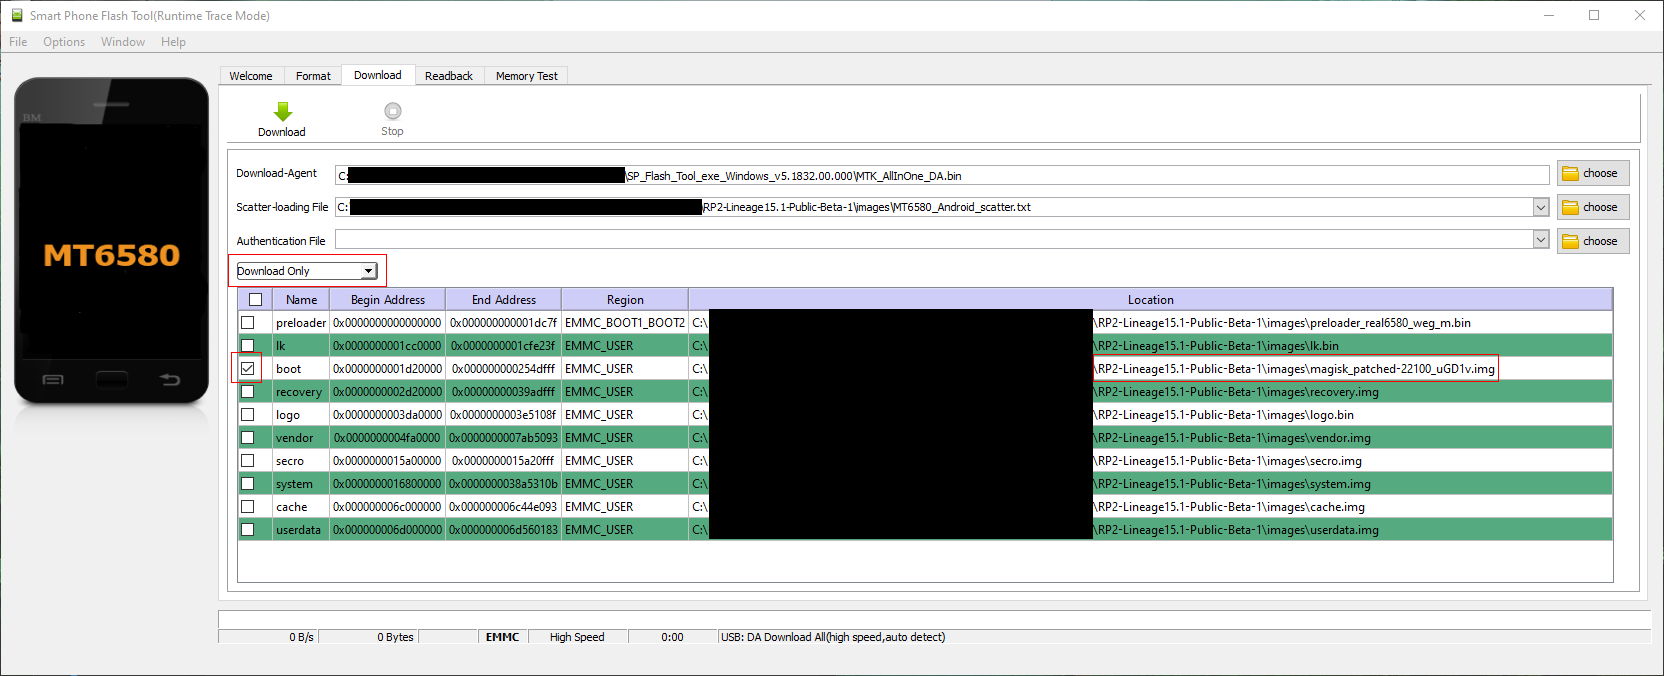
- Click the checkbox to the left of the row with `boot` for the name.
- Click the location column of the `boot` row and find your patched image file.
- Double check to make sure everything is right. Use the image below to verify you have the correct settings.
- Once you are sure everything is right, click the download button at the top of the screen.
- Connect your RP2 to the PC using the USB-C cable (be sure to use a USB 2.0 port).
- You should see a progress bar at the bottom and eventually a popup with a big green checkbox on it once the process is complete
Verify
- Unplug the RP2 from the PC and boot it up.
- Once it is booted, open the magisk app. You should now have a button bar at the bottom.
- Clicking the far right one (the puzzle piece icon) will allow you to install various plugins that utilize your new rooted device.
Useful Plugins and Tips.
| Plugin or App | Description / Instructions |
|---|---|
| ExSDCard Access Enable | An extension that allows apps to write to the external storage directly via a new path available on the root. The new path is `/mnt/media_rw`. |
| MixPlorer | Settings → More Settings. Click `Allow Root` option for access to all files on the RP2 in Mixplorer. |
| Termius | Enter the command `su` to get root access for termius. |
